HX20 Order Entry installation
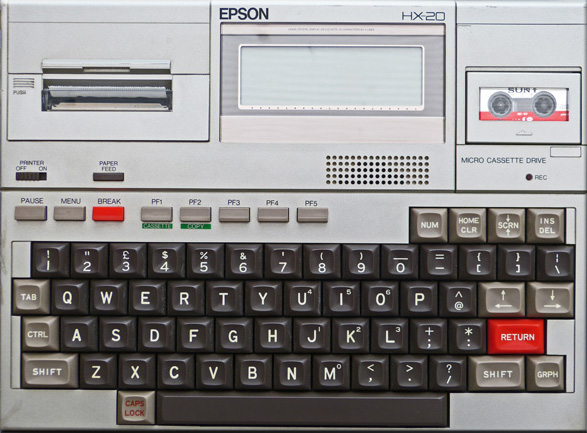
- The Epson HX20 portable (A4 size) computer was released in 1982. The standard model has just 16K bytes of RAM memory, a 4 line by 20 column LCD display screen, a 24 column microprinter and rechargeable Ni-Cad batteries.
- In the illustration, the option bay at top right is fitted with a microcassette tape drive for the purpose of installing the software.
- There is a built-in BASIC interpreter. The LOGIN command defines which one of the five available program areas (numbered 1 to 5) holds the active program (see the HX20 Basic Reference Manual page 3-36).
The software comprises two files: the Setup Procedure (ALPHA78L) and the Order Entry Program (ALPHA78). A substantial proportion of the 16K RAM is occupied by the software:
| System overhead and safety margin | 4K |
|---|---|
| Order Entry Program | 6K |
| Setup Procedure (if kept in RAM) | 3K |
The Setup Procedure lets you configure the residual RAM into one or more (up to seven) Order Partitions and one Outcome (TOS) Report. Only the most recent TOS report is needed in RAM, as the microprinter produces hard copy immediately on completion of telecoms. Each Order Line takes 12 bytes and each TOS ("Temporarily" Out of Stock) line takes 50 bytes. Assuming the HX20 is to be used only for Order Entry, and you configure a maximum of 20 TOS lines, you will normally be able to allocate up to 400 Order Lines provided you run the Setup Procedure and then overwrite it with the Order Entry Program. Please take care not to overrun the available RAM as the Setup Procedure cannot detect if you have allocated more memory than will be available (if memory does run out an "OM Error" message appears and the Order Entry Program stops).
When first run, the Order Entry Program protects itself against inadvertent (or other) modification by users. When installed in program area 2 it will also disable the BREAK key so users don't accidentally find themselves at the BASIC command prompt. When installed in any other area BREAK functions normally. This choice is provided because an unfortunate quirk in the hardware design disables the PAPER FEED button while BREAK is disabled. If you trust your user not to harass you with support calls whenever someone hits BREAK, you might graciously allow him the use of PAPER FEED (program area 4 is the recommended alternative).
HX20 Preparation
- FULLY charge the batteries first!
- Make sure that the power switch is in the off position and nothing is displayed on the screen. If anything is displayed on the screen after the power is off, press the RESET button.
- Plug the HX20's AC adapter into an AC outlet and then plug the other end into the HX20's power inlet. The batteries will be fully charged in about eight hours. Do not charge longer than eight hours.
The batteries will become warm during charging. This is normal. After the batteries have become fully charged and the adapter is left plugged in, the temperature of the batteries will increase. If you notice an unusual heat buildup on the case of the HX20 surrounding the batteries during the charging process, disconnect the adapter even if the eight hour time limit has not been reached.
HX20 Installation from Microcassette Tape
This is the quickest and simplest method. The tape holds both programs in sequence.
- Insert the Microcassette Drive. Connect the charger in case the battery is low.
Caution! Always ensure the HX20 is switched off before inserting or removing the Micro Cassette Drive. - Switch on. After the screen has settled down press the MENU button. The Epson Menu should appear (see the HX20 Operation Manual page 4-1) (ignore anything else which may appear). Press the @ key whilst holding down the CTRL key then initialize the system by entering date and time as indicated on the screen. The Epson Menu should reappear.
Any data and programs previously in RAM will have been deleted. - Press 2 to select BASIC. The cursor comes to rest under the BASIC prompt >.
- Type LOGIN 2 and press the RETURN key. The BASIC prompt reappears.
This command assumes you wish to load the Order Entry Program into program area 2. Alternatively, specify area 4 to avoid disabling BREAK and PAPER FEED. - Check that the correct tape is the correct side up in the microcassette drive. Type WIND:RUN"" and press the RETURN key.
- The tape is rewound, then moves forward with the screen displaying Searching. After a few seconds the screen should display Found: ALPHA78 and the tape moves forward again for about one minute. When the tape stops the Setup Procedure described following starts automatically.
For each Order Partition up to a maximum of seven partitions:Day (0=SUNDAY) Either type a number in the range 0 to 6 and press RETURN. The screen confirms Day, Date and Time which will now be maintained automatically by the HX20 clock. or type C and press RETURN to copy the Setup Procedure into program area 3. The Basic prompt > reappears. Now press the PF5 key to resume the Setup Procedure.
After all Order Partitions are defined:Title (max 19 chars) Either enter up to 19 characters and press RETURN or, if no further partitions are required, press RETURN (but if this is the first partition this will default the title to Order). Max lines(1:254) Enter the number of lines to be allocated in RAM for this partition. Order Ref (Y/N)? To allow the user to attach an 8-character Order Reference to each order, press Y here. Any other response (or no response) suppresses this option. Press RETURN to proceed. Auto t/f (Y/N)? If the user normally back-orders items not in stock, press Y here (the Order Entry Program will automatically display Req instead of Qty when adding a new line). Any other response (or no response) suppresses this option. Press RETURN to proceed. Access Code Enter the code allocated to this user. Password Enter the five character password assigned to this Access Code. Phone (max 16 chars) Either press RETURN alone if a manual modem is to be used or type Dn and press RETURN if a Hayes AT compatible modem will be used, where n is the wholesaler’s normal telephone number for dial-up order entry. See about modems. Max TOS (5:40) Either press RETURN alone to skip this and the next prompt (setup will allocate 20 TOS lines and no RAM file extension) or enter a number in the range 5 to 40 and press RETURN. 300/1200/2400
Speed Code (2/4/5)Type the code for the maximum usable communication speed between HX20 and modem, and press RETURN:
2=300bps(V21), 4=1200bps(V22), 5=2400bps(V22bis). - Setup now allocates RAM and records the details on the printer (please keep this printout for future reference)
- The screen displays Configured. The tape moves forward again for about two minutes as the Order Entry program is loaded into the program area specified in step 4 above. When loading is completed the edit form for the first partition will appear on the screen.
- Switch the HX20 off. Remove the Microcassette Drive from the option bay and replace the blank cover (or install modem if applicable).
HX20 Installation from PC
- Download HX20.zip (6K) and un-zip the two program files into GO.EXE's working directory on your PC.
- In GO.EXE's Telecom session, run main menu option H HX20 software download and follow the on-screen instructions.
HX20 Reconfiguration
Users may execute the following steps to change the Speed Code, Phone Number and any Access Code/Password combination without having to carry out the full Setup Procedure and without erasing any order currently entered in RAM. If you make a mistake which cannot be corrected by backspacing, switch the HX20 off then on and start again.
- With the cursor awaiting PIP-Code entry in the partition to be reconfigured, hold down the SHIFT key and press the HOME key. The Partition prompt should appear.
- Hold down the SHIFT key and press ! (exclamation mark) to start the following Reconfiguration Procedure:
300/1200/2400
Speed Code (2/4/5)Type the code for the maximum usable communication speed between HX20 and modem, and press RETURN:
2=300bps(V21), 4=1200bps(V22), 5=2400bps(V22bis).Phone Either switch the HX20 off if you are changing only the Speed Code or press RETURN alone if a manual modem will be used or type Dn and press RETURN if a Hayes AT compatible modem will be used, where n is the wholesaler’s normal telephone number for dial-up order entry. See about modems. Access Code Either switch the HX20 off if you are changing only the Phone Number or enter the Access Code allocated to this user and press RETURN. Password Enter the five character Password assigned to this Access Code and press RETURN. - The cursor returns to PIP-Code entry. If there are further Access Code/Password combinations to change in other partitions, repeat steps 1 and 2 in each partition. Note: if you are changing just the Speed Code and/or Phone number this need be done only once as all partitions share the latest values entered.
About using Hayes AT compatible modems
Note that the Phone field is a maximum 16 characters and is the last part of the "AT" command sent to the modem when option 5 (Dial&Send) is selected. It is represented by P$ in the relevant HX20 BASIC line 162:
162 GOSUB168:FORI=1TO200:NEXTI:PRINT#2,"ATX0"P$;CR;
Usually, P$ takes the form Dn where n is the number to dial (spaces may be entered, a comma introduces a pause, a T sets Tone dialling for following digits). When the user selects option 3 (Send) the Phone field is ignored and, in the BASIC line above, P$ has the value "D".
The above program extract requires that the modem’s power-up configuration be suitable for successful connection. The most important requirement is that the "DTE Speed" between modem and HX20 be constant regardless of the line speed. The chances are that this will be the case with recently purchased modems, provided the factory default configuration is not modified by the user (or by another program using the same modem). Given the limited resources available on the HX20, the only practical general solution is to edit the above program line if necessary, to adapt the program to the operating environment actually encountered, e.g. the pre-set string might be changed to "AT&FX0" to reset the factory default, or to "AT&B1X0" to ensure my old Worldport 14,400 modem operates at constant DTE speed.
The program automatically protects itself against modification every time it is run. To remove this protection, from 2 BASIC on the HX20 system menu LOGIN the program area containing the program and enter the command EXEC 2781 at the BASIC command prompt. If you make a mistake whilst editing the program, press CLS immediately and start again!