Epson HX20 Order Entry
The Battery
The HX20 contains a rechargeable Ni-Cad battery. Fully charged this will give many hours of service independently of any external power supply, however overcharging will reduce the service life of the battery and continuous charging may permanently damage it. The following operating procedure is therefore recommended:
- Operate the HX20 without connecting the charger.
- When the message CHARGE BATTERY appears on the screen, switch off.
- Make sure nothing is displayed on the screen. If anything is displayed on the screen after the power is off press the RESET button recessed in the right hand edge.
- Use only the supplied charger (which may be kept in the carrying case with the HX20). Plug the charger into mains, then connect it to the ADAPTOR socket at the rear of the HX20.
- The battery will be fully charged in about eight hours. But do not charge longer than eight hours.
No data is lost if the HX20 unexpectedly shuts down due to low battery charge, and you may continue using the HX20 whilst it is being recharged. But switch off whilst connecting the charger.
The Cursor
The underscore character "_" on the screen is called the Cursor. It indicates where the next valid keystroke will be displayed. Invalid keystrokes are either ignored or "beeped".
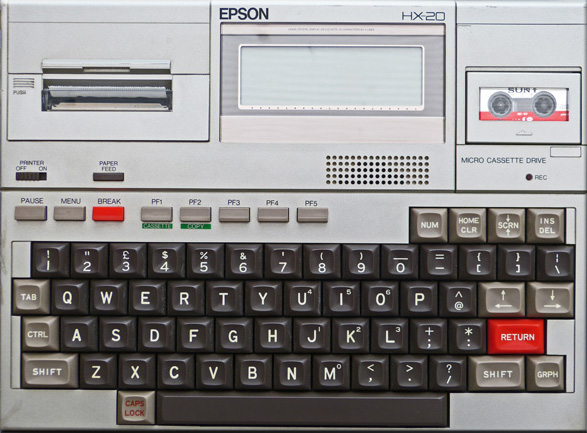
The Keyboard
The HX20 has a "type ahead" buffer, so there is no need to wait for each keystroke to appear on the screen. Do not hold a key down longer than necessary unless you wish the keystroke to be repeated automatically.
| Key | Position | Use |
|---|---|---|
| [left arrow] | above the red RETURN key | is a Back-Space key (used to correct a typing error within the field currently being entered). |
| DEL | Top Right of keyboard | is also a Back-Space key. |
| TAB | On Left Hand edge of keyboard | is used to clear the current field, or (when the field is already clear) to "Escape" from the current field. |
| CLR | next to the NUM key | functions exactly as the TAB key. |
| RETURN | the large red key | instructs the program to enter (or amend) data in the HX20 memory. Once written to memory, data is retained even if the HX20 is switched off. |
| SPACE BAR | unmarked, next to CAPS LOCK | has various functions as described later. |
| HOME | next to the NUM key | needs two fingers as you must hold down one of the SHIFT keys when you press HOME, hopefully making it difficult to press by accident. Its functions are described later. |
| NUM | This key disables/enables the letter keys. If letters have been inadvertently disabled press NUM again. | |
| CAPS LOCK | This key switches from capital to small letters and vice versa. The program ignores small letters, so if this is happening press CAPS LOCK again. | |
| PRINTER OFF/ON | When entering or amending an order, an Edit Report will be printed only if this switch is in the ON position. | |
| PAPER FEED | For obscure reasons this button is disabled whilst the program is running. Usually the paper may be gently pulled up by hand; if you need the paper feed (eg. whilst threading a new roll of paper) press MENU to enable PAPER FEED. | |
| MENU | This grey button closes the Order Entry program. | |
| PF1 to PF5 | It is possible to setup these keys to automatically generate up to ten Code Numbers for your most frequently ordered lines. Use the MENU key to enter BASIC then refer to the Basic Reference Manual page 3-26. |
Replacing the Paper Roll
A red trace on the paper indicates the roll is nearly finished. Replacing the roll is fairly straightforward provided you do not try to feed the new sheet through by hand. Instead, turn the HX20 power on, the PRINTER switch on and press the MENU key. Now insert the leading edge of the roll into the paper inlet and hold the PAPER FEED button down until the paper emerges from the top of the printer in about 15 seconds. Refer to the Operation Manual page 1-4 if in difficulty.
Creating and Editing an Order
Switch the HX20 on at the POWER switch on the right hand edge and adjust the VIEW ANGLE knob alongside to give the best display on the screen. If you wish to have a printed record of your editing slide the PRINTER switch to ON. After about 10 seconds the screen will settle into one of the three forms:
Order    _
-------------------
   PIP Code
Order
-------------------
   PIP Code
1 _
Order
-------------------
12 012-3455 Q= 3
13 _
The first two forms show an empty Order File. The first form appears only if the "Customer Reference" option was activated when the HX20 program was setup for your use. The cursor symbol "_" in the top line indicates that the program is waiting for you to type up to eight-characters Customer Reference (this will be printed on your wholesaler's invoice). Your previous Customer Reference is displayed for information until you start to type. Press the RETURN key to proceed to the second form.
The cursor symbol in the bottom line of the second form indicates that the program is waiting for you to type in a seven-digit PIP Code (or Product Code) against line number 1.
The cursor appears in a similar position on the third form, but here the line number is 13 as there are already 12 lines in the Order File. The 12th line is displayed for your information.
Type in the next Code you wish to order, or an earlier Code you wish to view, amend or erase from the order. All valid Codes contain a Check Character. The HX20 will try to catch miskeyed Codes by verifying the check character. If it is wrong the HX20 beeps and will not proceed until you backspace to correct the error.
If the Code you have just entered is new in this order, the program now asks for your Order Quantity:
1 080-6240 Q= 1
The Quantity field is preset to 1, so you may press the RETURN key alone to order one. Otherwise type in up to three digits and then press the RETURN key. The cursor moves on to the next line.
If you backspace when the cursor is at the beginning of the Quantity field the text "Q=" changes to "R=". "R=" indicates to our computer that you require any units ordered but not currently in stock to be automatically placed on Back Order.
To order by the Case (i.e. Outer) press the letter C key instead of pressing RETURN.
If the Code you entered above is already in this order, the program redisplays the relevant line and refuses to accept any quantity digits until you backspace the cursor to amend the previous entry. If you amend the quantity to zero the line will be erased from the order. If you don't want to change the previous entry, press TAB.
Options
When there is at least one line in the current order, pressing the TAB key when the cursor is at the beginning of a line will produce a menu selection:
Order
1 Review   3 Send
2 Print    4 Void
Press TAB to return to Order Entry, otherwise select option 1 to 4 as required:
- REVIEW. The current order is displayed from line 1 advancing one line each time the SPACE BAR is pressed. Press TAB to close the review.
- PRINT. The current order is listed on the printer. Press TAB to stop the printout.
- SEND. See below.
- VOID. Press the HOME key whilst holding down a SHIFT key if you wish to erase the current order from HX20 memory, otherwise press any other key.
Partitioning
The HX20 may contain up to seven completely independent Order Files. Each Order File has its own Partition within the HX20 memory, identified by a number 1 to 7 as determined when the HX20 was setup for your use. To change to another partition:
- Press the HOME key whilst holding down a SHIFT key when the cursor is at the beginning of the PIP Code field. The program displays the Partition prompt.
- Enter the required partition number. That partition is now the current Order File until another partition is selected, even if the HX20 is switched off.
Note: You may recover an order which has been erased by the SEND or VOID options by pressing the 0 key here instead of a partition number.
The Clock and Calendar
When the cursor is at the beginning of an order line, pressing the SPACE BAR will display the current day, date and time. Press any key other than HOME to return to line entry.
To reset the clock (but not the calendar), press HOME whilst holding down a SHIFT key. The cursor is repositioned over the time field, which may be retyped in 24-hour clock format. The clock will be reset when the RETURN key is pressed.
Sending
If you are uncertain as to the state of charge of the HX20 battery, it is a good idea to have the HX20 on-charge when sending an order.
- Connect the cable from the modem to the RS232-C socket at the rear of the HX20. If the modem has an "Originate/Answer" switch this must be in the "Originate" position.
- Switch the HX20 on. If necessary, select the relevant partition (only one partition is sent per call). Press TAB and select option 3 (Send). The HX20 display takes on the form:
Order
12 lines
Trying to send
Turn off to stop - When your telephone line is connected to the wholesaler's modem you will hear a continuous tone (this is the "Carrier" signal). Now press the DATA button on your Modem and place the telephone handset back on the hook..
- The display shows how many lines have been sent (if it continues to show Trying to send then something is wrong). When all lines are sent the display changes to show how many lines the wholesaler's computer has so far checked for stock availability. The HX20 stores any Out-of-Stock information received; this will be printed when the call is completed.
- When all lines have been checked (or accepted by the wholesaler for checking later) the HX20 displays Done with phone and starts to print its report. Ensure that the modem reverts to off-line (release the DATA button).
- You may defer the report until later by switching the HX20 off once the print is in progress (it will be reprinted automatically when you next switch on). When the whole report has been printed the order is erased from memory ready for you to enter a new order.
If you do not wish to wait on the phone for the stock check to complete you may switch the HX20 off once the screen confirms the check is in progress. Switch the HX20 on again to print as much of the report as was received.
If your call is cut-off during order sending you must send the whole order again as the wholesaler cancels incompletely received orders. It is easy to determine whether the order should be sent again: switch the HX20 off then on again. If the order has not been erased from memory it needs to be sent again.